Image to Stamp Tool User Guide & Tutorial | PixSprout
Table of Contents
Welcome to the Image to Stamp editor on PixSprout. This comprehensive guide will help you navigate the interface and utilize all the powerful features to create custom stamps, logos, and digital seals.
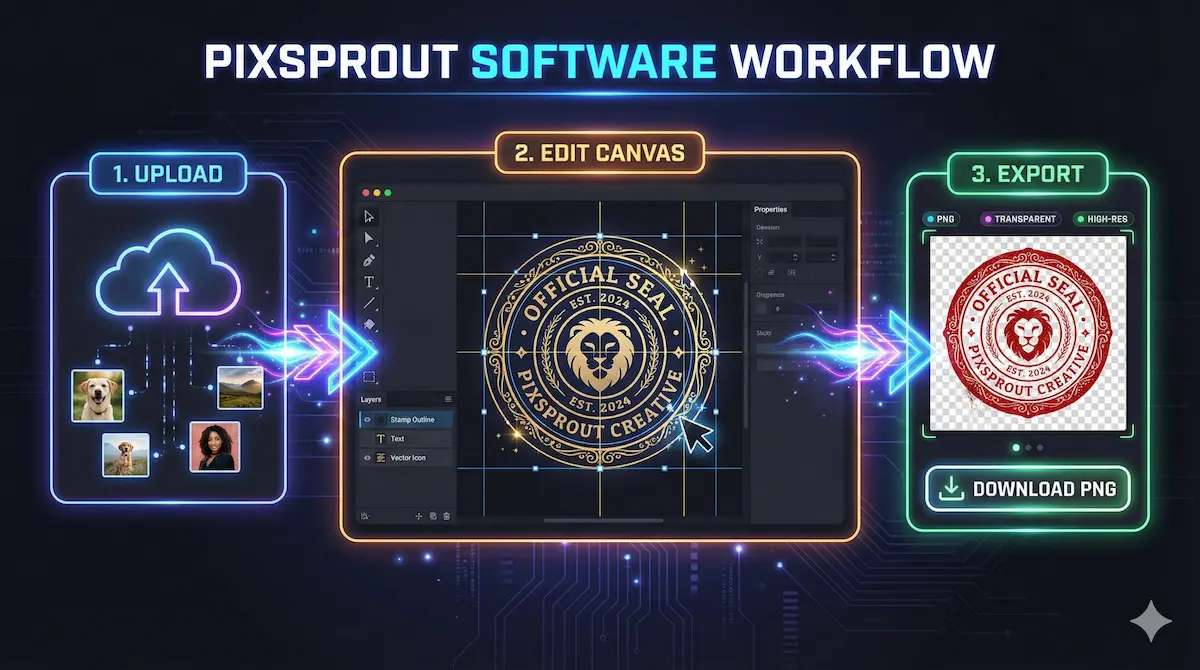
1. Upload & Templates (Left Panel: UploadPanel)
Start your design journey here.
- Upload Image: Click the upload box to select your file.
- Supported Formats: JPG, PNG, WEBP, HEIC, HEIF.
- Once uploaded, the image becomes your main preview layer.
- Try Samples: Click the thumbnails to switch between different design styles or examples. If a template has multiple configurations, you can switch between them below the thumbnails.
- Template Info: View tags and descriptions to understand the template's purpose.
- "Create" Button:
- Clicking this consumes credits to trigger the AI generation.
- Mode Selection: Before generating, a prompt will ask you to confirm the mode (Photo, Pet, Object, Portrait, etc.) to ensure the best result.
2. Top Toolbar (Canvas Controls)
Located at the top of the canvas, this bar manages adding elements and global settings.
- Add Elements:
Add Sticker: Insert a new sticker layer.Add Text: Insert text (supports circular/curved layouts).Add Ring: Insert a decorative ring or border.Add Stroke: Insert custom lines or strokes.
- Tools:
- Undo/Redo: Revert or re-apply changes.
- Guides: Toggle the 3x3 grid reference lines.
- Canvas Settings (Gear Icon ⚙️):
- Background: Pick a color, toggle transparency, or view recent colors.
- Shape: Set the canvas export shape (Circle, Ellipse, Rectangle, Triangle, Star, Hexagon).
- Note: Rectangles allow corner radius adjustments; Ellipses/Rectangles allow aspect ratio input.
- Export Width: Define the pixel width for the final output.
- JSON Tools:
Copy JSON: Copy the current canvas configuration.Import JSON: Paste a preset configuration (includes a "Use Current Template" shortcut).Export: Save your final work.
- Status: A loading mask appears over the canvas during generation or loading.
3. Canvas Interaction
Directly edit your design in the central workspace.
- Move & Resize: Drag layers to move them. Use the corner handles to scale or rotate.
- Specific Handles:
- Ring: Adjust thickness and arc length.
- Text: Adjust the radius for circular text.
- Stroke: Adjust thickness or curve tension.
- Context Menu (Right side of selection):
- General: Delete, Download Layer, Copy, Reset.
- Image: Flip X, AI Remove Background (consumes credits), Undo Remove BG.
- Text: Flip X/Y.
- Stroke: Add point (for editing paths).
- Text Formatting Wheel: When text is selected, floating circular buttons allow quick toggling of Bold, Italic, Underline, and
Strikethrough. - Compass: A center guide displays coordinates and curve node info for precision.
4. Configuration Panel (Right Panel: ConfigPanel)
When an element is selected, this panel offers detailed customization options.
Text Settings
- Text Form: Choose between Circle, Arc (adjustable curvature), or Straight line.
- Typography: Select Font (with recent history), Font Size, and Letter Spacing.
- Modifiers: Flip Horizontally/Vertically.
- Layout: Choose modes like Symmetric Continuous.
- Transform: Rotate, Zoom (Radius), and Color picker.
Ring Settings
- Shape: Default is "Auto", but can be forced to Circle, Rectangle, Star, etc.
- Stroke Style:
- Type: Solid, Dashed, or Dotted.
- Modifiers: Enable Double lines or Wavy effects.
- Fine Tuning: Adjust Wave Amplitude, Wave Length, Gap length, and Dash length.
- Appearance: Stroke Width, Zoom (overall size), and Rotation.
Image & Stroke Settings
- Image: Replace sticker, Scale, Rotate, Opacity. Use the Remove white background slider to make white pixels transparent without using AI credits.
- Stroke: Define shape (Line/Poly/Curve), style (Solid/Dash/Dot), and edit individual nodes (X/Y coordinates).
5. Layers Panel (Right Side)
Manage your design stack.
- Overview: View all layers with thumbnails (images) or content previews (text).
- Actions: Hover over a layer to Reveal Up/Down, Download individual layer, Copy, or Delete.
- Counter: Shows the total number of layers.
6. Background Removal & Generation
- Generation: Clicking "Generate" replaces the main image with the AI result.
- Background Removal:
- AI Removal: Select an image layer and click the "Magic Wand/Eraser" icon in the context menu (consumes credits).
- Manual Slider: Use the "Remove white background" slider in the Config Panel for simple white-to-transparent conversion.
7. Export & Download
- Global Export: Use the top-right export button (or JSON tool) to download the full composition based on your Canvas Settings (resolution and shape).
- Layer Export: Use the "Download layer" button in the context menu or Layers panel to save specific elements (e.g., just the text or just the logo).
8. Tips & Safety
- Unsaved Changes: The tool warns you before switching templates or leaving the page if you have unsaved edits.
- Remove BG Guide: Tooltips guide you through the background removal process (Select Layer -> Click AI Remove -> Use Bucket tool for fine-tuning).
Recommended Posts
Stop Getting Hand Cramps: The Brutal Truth About Signature Stamp Makers
Tired of signing hundreds of checks by hand? Most custom signature stamps end up looking like smudged garbage. Here's exactly how to get one that actually works.
Custom Stamp Maker Guide: DIY Machines vs. Pro Services vs. AI Tools
Stop wasting money on bad ink. Here’s the honest truth about custom stamp makers, from the Silhouette Mint to digital AI design tools.
AI Stamp Maker: Stop Overpaying for Custom Digital Seals (2026 Guide)
Still waiting days for a designer to make a simple stamp? Stop. Here’s how AI stamp makers let you generate custom, vintage, or business seals in seconds.
Pet Memorial Stamp Design Maker: Turning Memories into Keepsakes
The house feels too quiet? Create a custom pet memorial stamp to honor your best friend. A simple, heartfelt guide to turning photos into lasting tributes.
Custom Portrait Stamp Maker for Wedding: The DIY AI Guide
Don't pay the 'wedding tax' for custom art. Learn how to use AI to generate your own wedding portrait stamp design in seconds with PixSprout.
Convert Logo to Stamp PNG Transparent: The 'No-Stress' Guide
We've all struggled with Photoshop masks. Here is how to convert your logo to a realistic stamp PNG without losing your mind.
Comments
No comments yet